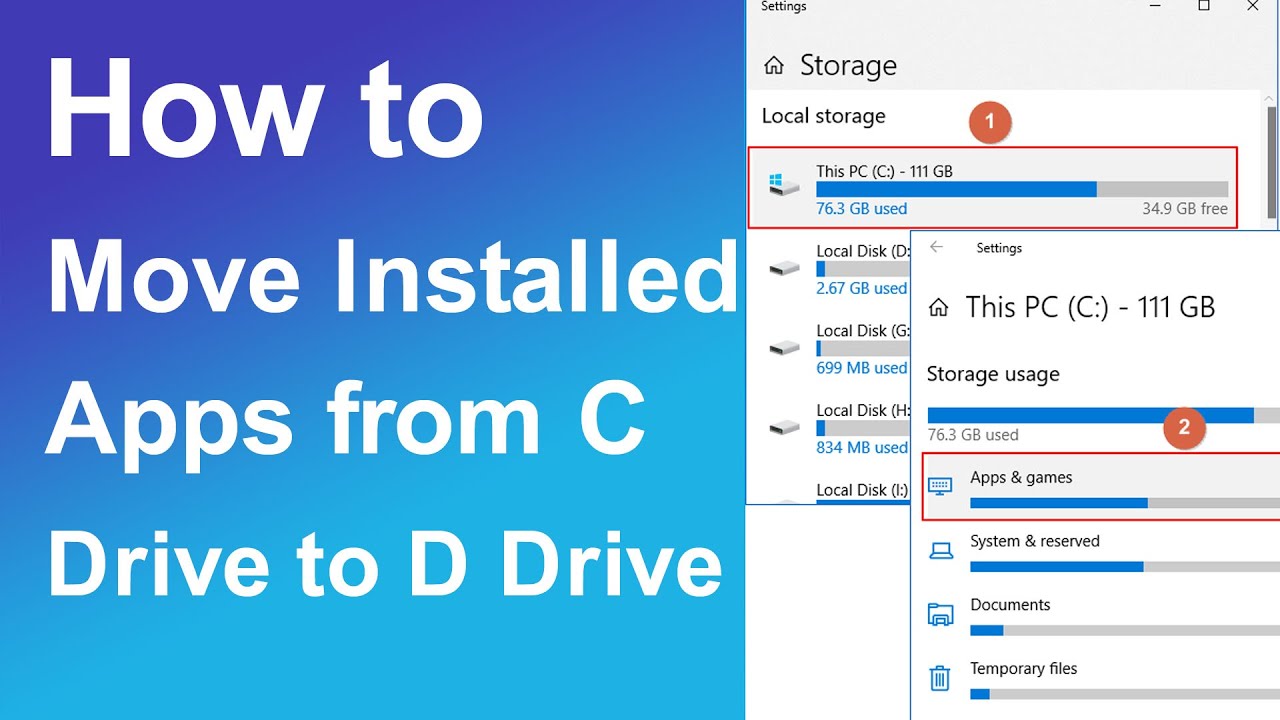
Moving installed applications to another drive in Windows is a valuable technique for freeing up space on your primary boot drive (usually the C: drive) or consolidating your software. This is particularly useful if your C: drive is a smaller Solid State Drive (SSD) that you want to keep optimized for the operating system, while storing larger applications, like games, on a secondary Hard Disk Drive (HDD) or a larger SSD.
Windows 10 and Windows 11 offer different approaches for moving apps, depending on how they were installed: through the Microsoft Store (UWP apps) or as traditional Win32 desktop programs (like most games and productivity software).
Method 1: Moving Microsoft Store Apps (UWP Apps)
Applications installed from the Microsoft Store are often UWP (Universal Windows Platform) apps. Windows provides a direct and easy way to move these.
Step 1: Open Windows Settings
- Click the Start button and select Settings (gear icon).
- Alternatively, press Windows Key + I.
Step 2: Navigate to Apps Settings
- In the Settings window, click on Apps in the left-hand menu.
- Then, click on Installed apps (or Apps & features on Windows 10).
Step 3: Select the App to Move
- Scroll through the list of installed applications or use the search bar to find the app you want to move.
- Click on the three-dot menu (⋮) next to the app (Windows 11) or click on the app name (Windows 10) to expand its options.
- Select “Move”.
Step 4: Choose the Destination Drive
- A dialog box will appear asking you to choose a new drive for the app.
- Select the destination drive from the dropdown menu (e.g., D:, E:).
- Click “Move” to start the transfer.
- Completion: The app will begin transferring. The time taken depends on the app’s size. Once complete, the app is ready to use from its new location.
- Limitations: Not all Microsoft Store apps can be moved. If the “Move” button is grayed out, it means the developer has opted not to allow the app to be moved this way.
Method 2: Moving Traditional Desktop Programs (Win32 Apps)
Moving traditional desktop programs (e.g., games from Steam, Adobe Creative Suite, Microsoft Office) is more complex than UWP apps, as they often scatter files across multiple system directories and rely on specific registry entries. Directly cutting and pasting them will break them. For these, we use a technique called Symlinks (Symbolic Links) or dedicated gaming platform features.
Option A: Using Symbolic Links (Advanced, for Any Program)
A symbolic link (or symlink) is a special type of file that points to another file or directory. When you create a symlink for a program’s installation folder, Windows (and the program itself) will “think” the program is still in its original location, even though the actual files have been moved to a different drive.
- Prerequisites:
- You need to be logged in as an Administrator.
- The destination drive must be NTFS formatted.
- Process Overview:
- Copy the entire program folder from its original location (e.g., C:\Program Files\Program Name) to the new drive (e.g., D:\Programs\Program Name).
- Delete the original program folder from the C: drive.
- Create a symbolic link in the original location that points to the new location.
Step-by-Step (Using mklink command in Command Prompt):
- Identify Original and New Locations:
- Original Path: The full path to the program’s installation folder on your current drive (e.g., C:\Program Files (x86)\Steam\steamapps\common\Grand Theft Auto V).
- New Path: The full path where you want to move the program on your other drive (e.g., D:\Games\Grand Theft Auto V).
- Copy the Program Folder:
- Right-click the program’s installation folder in its original location on the C: drive (e.g., C:\Program Files\Program Name).
- Select “Copy.”
- Navigate to your desired new drive and folder (e.g., D:\Programs).
- Right-click in the empty space and select “Paste.” Wait for the copy process to complete.
- Delete Original Program Folder:
- Once the copy is complete, go back to the original location of the program folder on your C: drive.
- Right-click on the original program folder and select “Delete.” Confirm the deletion.
- Make sure you’ve successfully copied before deleting!
- Open Command Prompt as Administrator:
- Click the Start button.
- Type “cmd” or “Command Prompt“.
- Right-click on “Command Prompt” and select “Run as administrator.”
- Click “Yes” on the User Account Control (UAC) prompt.
- Create the Symbolic Link:
- In the Command Prompt window, type the mklink command. The syntax is: mklink /D “Original Path” “New Path”
- Replace “Original Path” with the path you deleted (e.g., C:\Program Files (x86)\Steam\steamapps\common\Grand Theft Auto V).
- Replace “New Path” with the path where you pasted the folder (e.g., D:\Games\Grand Theft Auto V).
- Example Command:
DOS
mklink /D “C:\Program Files (x86)\Steam\steamapps\common\Grand Theft Auto V” “D:\Games\Grand Theft Auto V”
- Press Enter.
- You should see a message confirming that the symbolic link has been created: “symbolic link created for [Original Path] <<===>> [New Path]”.
- Test the Program:
- Try launching the program as you normally would (e.g., from its desktop shortcut or Start Menu entry). If the symlink was created correctly, the program should launch and function normally.
- In File Explorer, the original folder location will now show an icon with a small arrow, indicating it’s a symbolic link.
Option B: Using Game Platform Features (for Games from Specific Launchers)
Game launchers like Steam, Epic Games Store, and Origin/EA App have built-in features to move installed games. This is much simpler and safer than manual symlinks for games.
Steam:
- Create a New Steam Library Folder:
- Open Steam.
- Go to Steam (top left) > Settings > Storage.
- Click the “+” icon (or “Add Library Folder” on older versions).
- Choose your new drive (e.g., D:) and create a new folder (e.g., D:\SteamLibrary). Select this as a new Steam Library folder.
- Move the Game:
- In the Steam Storage Manager, select the drive where the game is currently installed (e.g., C:).
- Select the game(s) you want to move.
- Click “Move” (or “Move Installation Folder”).
- Choose the new Steam Library folder you just created on your other drive.
- Click “Move” again.
Epic Games Launcher:
- Verify Game Files:
- Open Epic Games Launcher.
- Go to your Library.
- Click the three dots (…) next to the game you want to move.
- Select “Manage” (or similar).
- Click “Verify” to ensure files are intact.
- Move the Game:
- Close the Epic Games Launcher completely.
- Manually cut the game’s installation folder from its original location (e.g., C:\Program Files\Epic Games\GameName).
- Paste the folder to your desired new location on the other drive (e.g., D:\Epic Games\GameName).
- Reopen Epic Games Launcher. The game will likely appear as “Installed” but with a grayed-out “Launch” button or a prompt to “Install.”
- Click the three dots (…) next to the game.
- Select “Locate” (or “Browse for game location”).
- Navigate to the new location where you pasted the game folder (e.g., D:\Epic Games\GameName) and select it.
- The launcher will verify the files and should now recognize the game in its new location.
Note: For other launchers like EA App (formerly Origin), Ubisoft Connect, or GOG Galaxy, the process is generally similar: often involving a “Move Game” option within their settings or requiring a manual copy/paste followed by a “Locate Game” function.
Important Considerations
- Administrator Rights: Moving apps and creating symbolic links requires administrator privileges.
- NTFS Format: The destination drive for desktop applications (and symbolic links) must be formatted as NTFS. Most internal and external drives are already NTFS, but if you’re unsure, check in Disk Management.
- Running Programs: Ensure the application you are trying to move is not running during the transfer process.
- System Files/Critical Apps: Do NOT attempt to move critical Windows system applications (like Paint, Calculator, or core OS components) or apps that are deeply integrated with the system (e.g., antivirus software, drivers) using these methods. Stick to larger, self-contained programs.
- Backup: Always back up important data before making significant changes to your drive structure.
By leveraging these methods, you can efficiently manage your disk space and optimize your system’s performance by moving demanding applications to a suitable drive without the inconvenience of reinstalling Windows or your entire software library.
Frequently Asked Questions (FAQ)
Q1: Why would I want to move installed apps to another drive?
A1: The main reasons are:
- Free up space on the C: drive: Especially if your primary drive is a smaller SSD, moving large apps frees up crucial space for the operating system to function optimally.
- Optimize performance: You can put frequently used apps on a faster SSD while less critical large files (like older games) remain on a slower, larger HDD.
- Better organization: Keep your OS separate from your applications.
Q2: Can I move any installed app using these methods?
A2:
- Microsoft Store apps: Most, but not all, Microsoft Store (UWP) apps can be moved directly via Settings. If the “Move” button is grayed out, it cannot be moved this way.
- Traditional desktop programs (Win32): You can move almost any traditional program using the symbolic link method, as long as it’s not a core system application. However, it’s generally best to use the built-in “move game” features of game launchers (Steam, Epic, etc.) if available, as they are safer and simpler.
Q3: What is a “symbolic link” and how does it help move apps?
A3: A symbolic link (symlink) is like an advanced shortcut. It’s a special file or directory that points to another file or directory located elsewhere on your computer. When you create a symlink in a program’s original installation path that points to its new location on another drive, Windows (and the program itself) will follow that link. This makes the program “think” its files are still in the original spot, even though they’ve physically moved, allowing it to run normally without reinstallation.
Q4: Is it safe to delete the original program folder after creating a symbolic link?
A4: Yes, once you have successfully copied the program folder to the new drive and then successfully created the symbolic link, you must delete the original program folder from the source drive. The symbolic link acts as a pointer; if the original folder remains, it can cause conflicts. Ensure the symbolic link works before deleting the original.
Q5: Will moving an app affect its performance?
A5: Yes, moving an app can affect its performance, usually for the better if you’re moving it to a faster drive.
- HDD to SSD: Moving an app from an HDD to an SSD will significantly improve performance, leading to faster loading times and better responsiveness.
- SSD to HDD: Moving an app from an SSD to an HDD will likely decrease its performance, making it load and run slower. This is generally done only for very large, less-frequently used applications to free up space on the faster SSD.