Disabling unnecessary startup programs in Windows can significantly improve your computer’s boot time and overall performance. Many applications set themselves to launch at startup, consuming system resources and slowing down your PC. This guide provides step-by-step instructions to manage and disable startup programs across various Windows versions.
Understanding Startup Programs
Startup programs are applications that automatically run when your computer boots up. While some are essential (like antivirus software), others may not be necessary and can slow down your system. Managing these programs helps in optimizing system performance.
Method 1: Using Task Manager (Windows 8, 10, and 11)
Open Task Manager:
Press
Ctrl + Shift + Escto open Task Manager directly.Alternatively, right-click on the taskbar and select Task Manager.
Navigate to the Startup Tab:
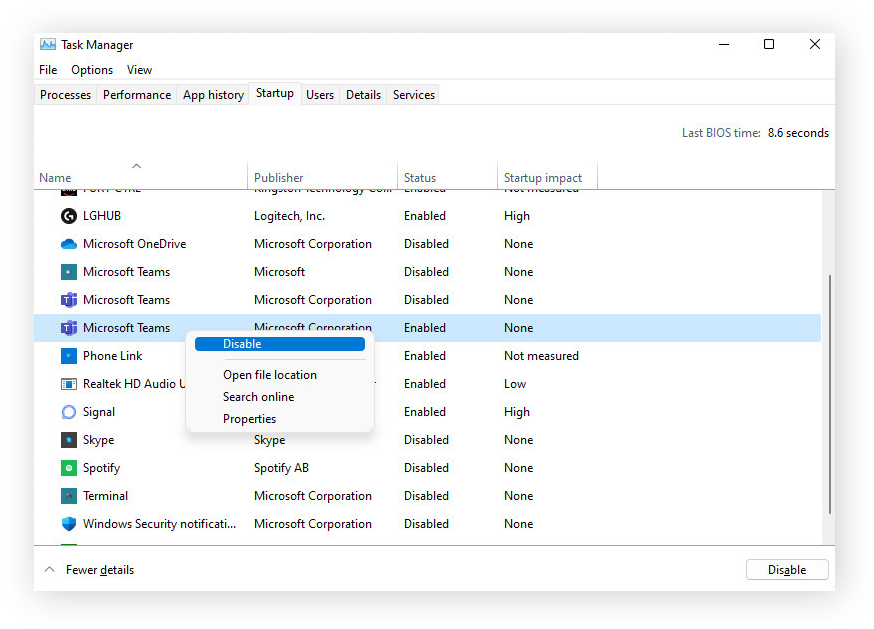
In Task Manager, click on the Startup tab.
Here, you’ll see a list of programs that start with Windows, along with their Startup impact.
Disable Unnecessary Programs:
Right-click on the program you want to disable and select Disable.
Repeat this for all programs you don’t need at startup.
Note: Be cautious not to disable essential programs like antivirus software.
Method 2: Using Settings (Windows 10 and 11)
Open Settings:
Press
Windows + Ito open the Settings app.
Navigate to Startup Settings:
Go to Apps > Startup.
Manage Startup Programs:
You’ll see a list of apps with toggle switches.
Turn off the toggle for apps you don’t want to start automatically.
Note: This method provides a user-friendly interface to manage startup programs.
Method 3: Using System Configuration (MSConfig) (Windows 7 and Earlier)
Open Run Dialog:
Press
Windows + Rto open the Run dialog box.
Launch MSConfig:
Type
msconfigand press Enter.
Access Startup Tab:
In the System Configuration window, click on the Startup tab.
Disable Programs:
Uncheck the boxes next to programs you don’t want to start automatically.
Click Apply, then OK.
Restart your computer to apply changes.
Note: MSConfig is primarily a troubleshooting tool; use it cautiously.
Method 4: Using the Startup Folder
Open Run Dialog:
Press
Windows + Rto open the Run dialog box.
Access Startup Folder:
Type
shell:startupand press Enter.
Manage Shortcuts:
The Startup folder contains shortcuts to programs that start with Windows.
Delete any shortcuts of programs you don’t want to run at startup.
Note: This method affects only programs added to the Startup folder.
Method 5: Using Autoruns (Advanced Users)
For a more comprehensive control over startup programs, you can use Autoruns, a free utility from Microsoft Sysinternals.
Download Autoruns:
Visit the official Microsoft Sysinternals website and download Autoruns.
Run Autoruns:
Extract the downloaded file and run
Autoruns.exeas an administrator.
Manage Startup Entries:
Navigate through the tabs to see various startup entries.
Uncheck the entries you want to disable.
Note: Be cautious when using Autoruns, as it displays advanced system entries.
Tips for Managing Startup Programs
Identify Essential Programs: Ensure you don’t disable critical system or security programs.
Research Unknown Programs: If you’re unsure about a program, research it online before disabling.
Regular Maintenance: Periodically review your startup programs to keep your system optimized.
Use Built-in Tools: Utilize Windows’ built-in tools before resorting to third-party applications.
Conclusion
Managing startup programs is a straightforward yet effective way to enhance your computer’s performance. By disabling unnecessary applications from launching at startup, you can achieve faster boot times and a more responsive system. Regularly reviewing and adjusting your startup programs ensures your PC runs efficiently.